Phew, It’s over!

The party was a hit… I’m glad it’s over with.  I can just say to anyone who is planning a themed party…..get help!   Make a list of all the items for a particular area, assign someone just to do that (from start to finish).  Then cross if off you list.    We had a few extra hands but it still was not enough for all the small details. 

Saturday we made sure all the string was hung outside.  We had everything in our office ready to walk outside to set up but….the details took so much time.   Like I said at the start of this blog/subject several months ago….this was like a wedding.  You have to make sure you have deadlines for all the projects. 

We spent about $50 for paper to make decorations we made most of it (even the wooden sign).  We did pick up a few extra chairs at garage sale, painted them along the way.  Found mis-matched china over the past 6 months at different thrift stores.  Blue bottle where found at Jo-Anns for $1.00 each.  Table cloth where sheets from the thrift store ($3.27 each) plus the one we used to make napkins.  The cake and cupcakes where barter.  Plus food….  our grand total might be between $200-$250.  But there where a lot of extra stuff we bought and will use again.   Four days later and we’re still eating fresh fruit, sandwiches and drinking from a few bottles.  

Hope you enjoy the pictures and this project.     I’ll be on vacation for several week…until then.

Red Queen’s Crown or Alice?

So, I thought since it’s my daughters birthday, she should be like all the other little girls and wear a crown.   We have tried to make these in the past (for newborns) but where unsuccessful in getting the lace stiff.

I came across a youtube video about stiffening crochet items.  They used 2 parts Aleene’s Tacky glue to 1 part water.  With hands knead this mixture into the fabric.  The lace I used is thick.   So I did this and laid it outside yesterday.  Within 20 minutes it had dried.   .  So I then painted more of the mixture up…. and waiting, then did it again.   I wanted to make sure if was stiff.   After several layers of this and a few hours, I thought I would try one more thing.  I had once put mod podge in the over to “set it”.  So my oven went on at 220, painted mod podge on one side only and laid it on a cook sheet w/foil.     It baked for 20 minutes then I turned off the oven and allowed it to just sit for another 30 minutes.    It’s not as hard as I would like it…but it will work

Next I hand painted some details on the lace…. the curves the top part of the lace.  This I had to put some weight so that it stayed…as you can see, you have to have an imagination.    And I put another layer of glue behind the parts that where folded..keeping my fingers crossed that it will stay.

I think its time for me to try smaller scale of crowns.  😉

Tea Party – Photo Booth props

You can find printable props on the web, but you don’t have to keep them blah…..  embellish them with anything and everything you have around the house.   This project took me several weeks, due to all the cutting.  Some props deigns where cut 4 different times  I use cardboard, stiff felt, fabric, and cereal boxes…many, many toothpicks and lots of glue. I did not use a lot of hot glue due to the webs they make.

My favorite are the “in your face” glasses, “top Hat”, “2-D bow tie” and “long tie”.

Props

Less than 8 days till the party….more things to come

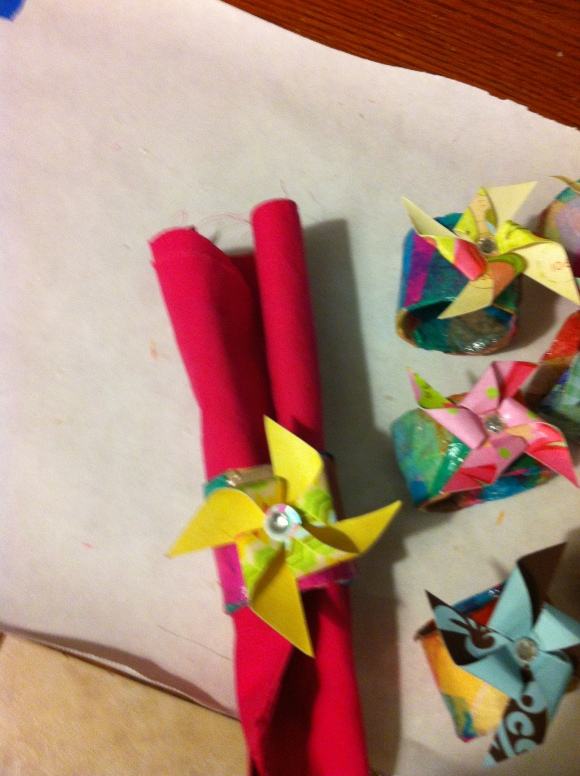
Tea Party napkin rings

Sorry I have not been around and Imageposting new stuff….It’s been crazy.   We’re nowImage at the end of this project and it’s a scramble to finish.    Last week I started on napkin ring holders out of toilet tissue holders, tissue paper and 1st layer is paper mache (I needed it to be stiff), then two or three more layers of mod podge with tissue paper and then to complete it, A 2 inch pinwheel.    Prior to putting on the pin wheel, I did go over the entire piece with mod podge and glitter  This was just enough to make is look “satin”.

All the napkins holders

Alice’s Garden – Mushrooms

We all know that Alice fell down that rabbit hole and then she ate cake and drank something..up and down her size went until she was just right.  At that time she walked out into a majestic  garden and the Mushrooms is the first thing you see.   This is what I want our backyard to turn into….. so many details.    I should be off w/my head!

This is also why I have started working on just about everything…and nothing quite finished.  But that ‘s okay, at least the major part is done.  So, I have started working on MUSHROOMS…. this is quite fun and does not require much attention.

1.  bowl that looks like a top of a mushroom – wrap in foil (I cut a basketball in two to make the bigger ones)

2. soda bottles, water bottle, TP roll etc…depending on the size your making.  I’ve used all three.

3.  apply the paper Mache

You will need to paper Mache the top several times, then sand it down.  Once it the size/height you like, glue the mushroom cone into the base and cover with a round piece of cardboard ..this fills the bottom up.   hope you can follow the pictures.  If not just comment here and I will explain more.  It’s late and I’m very tired so who knows how this post sounds.

More pictures will follow as I get them completed.

So far, here is the family.   I have two more sizes I want to make.  In this picture the smallest one is the only one ready to be painted.  All the others need something 1st….

UPDATE:  8/29 the green mushroom is next one to be completed.  In the family photo he is next  to the 1/2 painted blue on.    I have started a BIG mushroom…it’s gonna take some time (besides, you get tired of paper mache everyday!)

Love this little guy….

The start of a family…. so much fun!

Previous Older Entries

Blog Stats

  • 712 hits